
EDIT: 26/12/2023
Swagger is nowadays an essential tool for producing API documentation. It allows describing the routes, parameters, and return of each element of an API.
Swagger is an implementation of OpenAPI, which is the standard for implementing APIs.
The OpenAPI Specification (OAS) defines a standard, language-agnostic interface to RESTful APIs [...] without access to source code, documentation, or through network traffic inspection. https://swagger.io/specification/
One of the key advantages of using Swagger is that it offers a language-agnostic approach to defining APIs. This means that you can define your API without being tied to a specific programming language. In essence, Swagger serves as a language in itself, facilitating communication and documentation across development teams.
I won't talk too much about Swagger because that's not the purpose of this article. For those who have never used Swagger, check out this example of SwaggerUI :

Most importantly, it generates a JSON file representing the entire API. It can be shared, but not only. This is the starting point of NSwag.
Before going further, we need to analyze how the architecture is designed, and why clients facilitate data exchange.
Understand how clients work
A client, in this context, is a class that simplifies making queries to an API, whether it's an internal microservice or an external component.
In recent discussions around software architecture, microservices have gained prominence as a way to separate different aspects of an application into distinct projects. While there is ongoing debate about the advantages and disadvantages of microservices, we won't delve into that topic here.
Let's consider a scenario where an application relies on an authentication system managed by HashiCorp's Vault. Vault provides security for sensitive data via APIs but lacks a readily available client on NuGet for easy access to its functionalities.
In such cases, it's crucial to create a dedicated client that centralizes the logic for making Vault API calls. This client handles all aspects of the interaction, including gathering information, processing return objects, and handling exceptions. It becomes the gateway for any service that needs to interact with Vault. It is out of the question to query the service without going through the client.
This is where NSwag comes into play.
NSwag is a powerful tool that automates the generation of clients and controllers from Swagger or OpenAPI files, among other sources. It simplifies the process of creating clients for APIs by leveraging existing documentation.
Generate your client with NSwag
Since the exposure of the service is already documented by the swagger file, it would make no sense to develop the client to communicate from scratch.
This is where NSwag comes in to save us.
The Swagger/OpenAPI toolchain for .NET, ASP.NET Core and TypeScript.
NSwag is a set of tools mainly used to generate clients and controllers from Swagger/OpenAPI files and vice versa.
 RicoSuter
Start by building your NSwag configuration file with NSwagStudio
First of all, NSwag integrates interface tools called NSwagStudio to start using the library and configure all the parameters needed for command-line automation.
You can download it for free, and it is open-sourced:
RicoSuterThe functionality is quite simple:
- Specify the path to the API Swagger file as OpenAPI Specification
- Check the desired outputs, the CSharp client in this case
- Configure the settings to generate the client you need
- Click the Generate Outputs button and copy the generated class
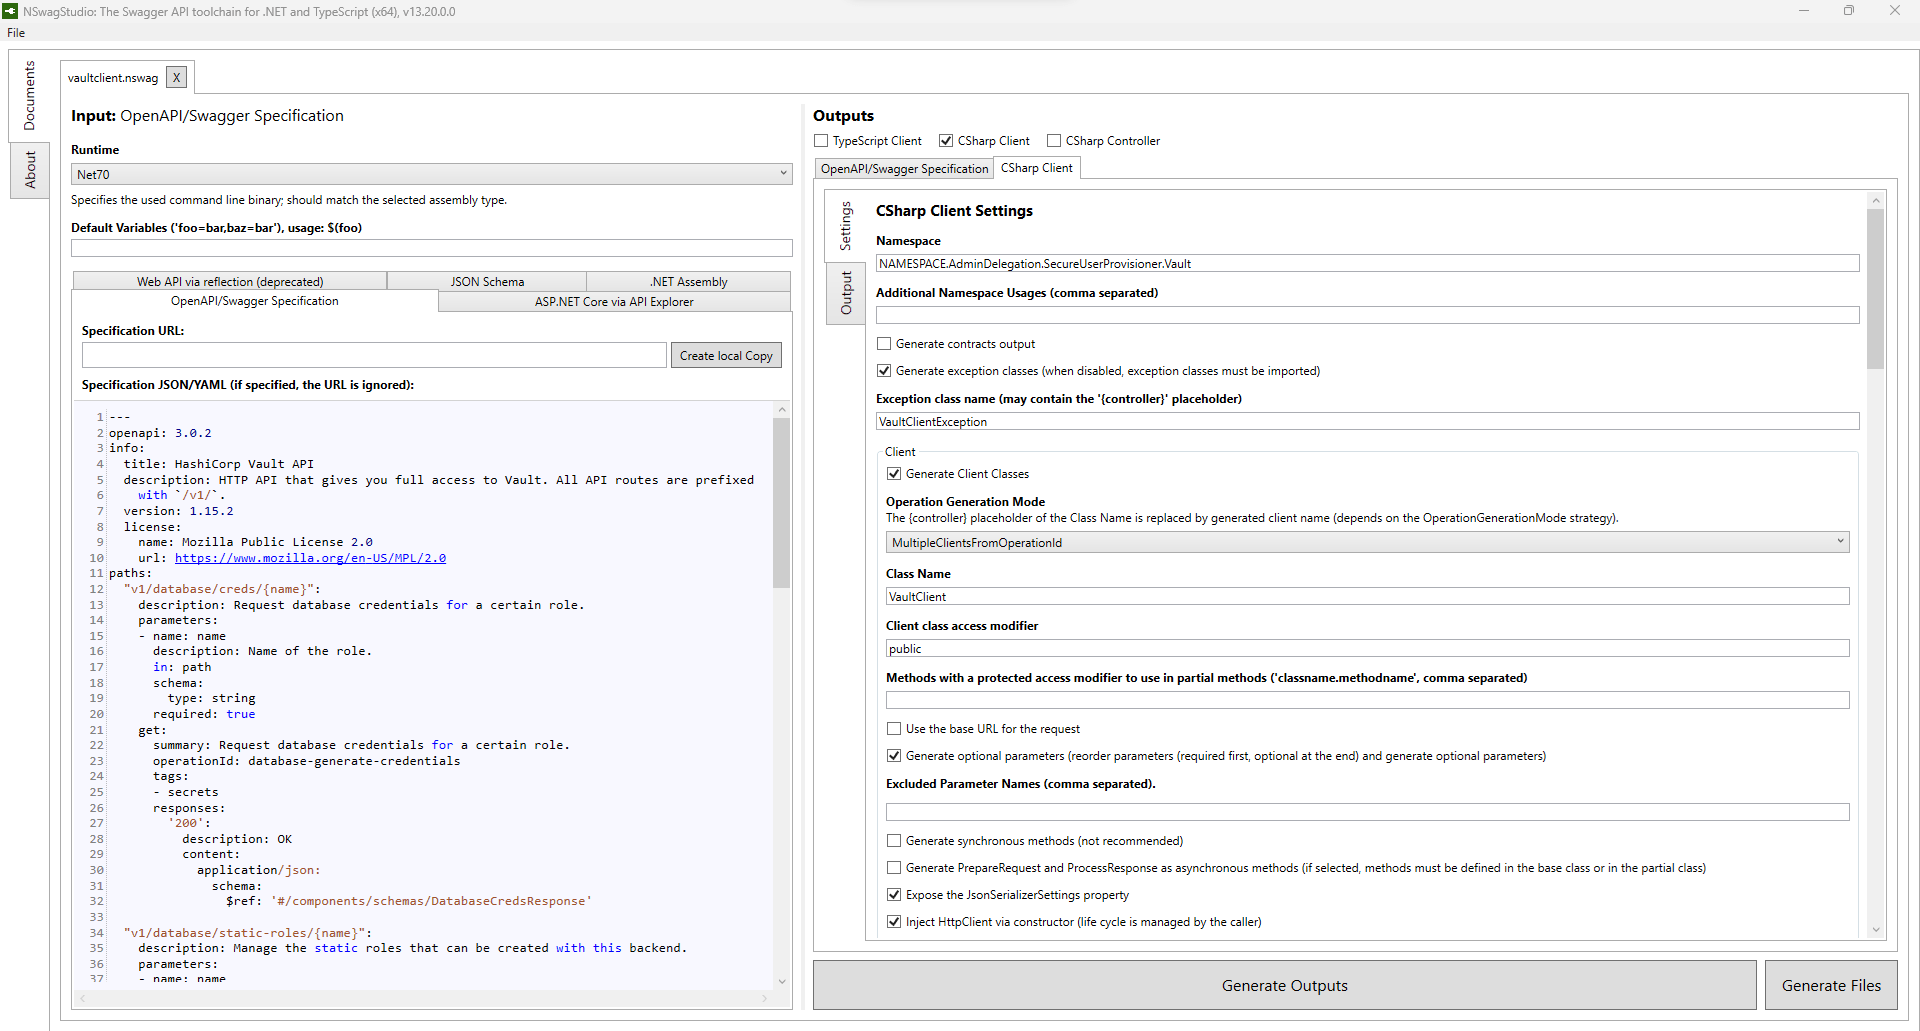
There is a lot of settings to configure your client, among them some of the most important :
- Namespace & Class Name
- Operation Generation Mode: builds the method name from the API route (full, partial...)
- Inject HttpClient: allows you to manage the lifecycle, including construction, outside the client
- DTO Class Style: defines the rules for creating objects to be exchanged with the API. It's important to use the right enumerable types, especially for lists of elements.
Try to deep dive into it to be sure to produce the class that needs it.
You can also easily modify the template which generates the class if you need to add parameters to the constructors for dependency injection, but I will do another article about it later. Let's focus on the client's generation.
Automatize the generation from microservice post-build event
The NSwag library also contains the NSwag.CodeGenerator.CSharp package to generate a client from a SwaggerFile. It is exactly the same package used in NSwagStudio but in command-line, installable from Nuget.
Since the NSwag file is already configured, the only remaining step is to generate the client via CLI.
Use the command nswag run /runtime:Net70 in the Package Manager console to generate the client from the configuration and the Swagger file.
Don't forget to modify the runtime if necessary.
You can take it a step further by automating the entire process at the post-build event of the microservice project to update the Swagger file and generate the client each time you build the API.
With this automated generation, you will be notified of any changes to the user microservice API. This means that if you add a route, you will be able to call it from the client.
More importantly, if an endpoint is modified by the route, the parameters, or the return object, compilation will no longer be possible on each dependent microservice.
Now the UserClient is fully configured, autogenerated, and can be called with the route as a parameter:
var client = new UserClient("URLOFUSERAPI");
var userInformation = client.GetUserInformation(USERID);
Pretty simple to use now, right?
Conclusion
The microservices architecture will become more and more important within robust applications.
Thinking upstream about the communication between microservices is mandatory to avoid creating dependencies and creating a monster where no one will want to add functionalities without being afraid to make everything collapse.
The use of clients is one of the essentials to properly manage the exchanges between these microservices.
And now you know how to do it properly.
Have a goat day 🐐
Join the conversation.